A heated towel rail is a surprisingly affordable luxurious addition to your bathroom. During the cold months, you can avoid shivering when you step out of the shower or tub by wrapping yourself in a warm towel.
Some people love warm towels so much that they stick a dry towel in the dryer before a shower to enjoy the warmth. That is not cost-efficient because of the energy usage on the dryer. It’s not terribly convenient either.
A heated towel rail will also keep your towels dry in between uses. Read on to learn how to fit a heated towel rail in 1 of 3 ways to ensure a proper fit in your bathroom.
Types of Heated Hanging Towel Rails
There are 3 types of heated towel rails.
The simplest is an electric towel rail that plugs into the outlet on your wall. There is also an electrical towel rail that is wired into the electrical system of your home and mounted to the wall.
The third is a hydronic towel rail, which is powered by the house’s hot water system. This kind of heated towel radiator connects to radiator lines in your floor or wall.
Read on to learn the supplies you’ll need and the process of how to fit a heated towel rail.
Supplies Needed
You will need several basic tools for installing a hanging towel rail. You will need a tape measure, pencil, Allen key, hammer, drill, and screwdriver.
You will also need an adjustable spanner, grips, masonry bit, crews, rule plugs, spirit level, PCFE tape, and either an angle grab or straight through valve depending on your pipework.
Got all that? Great, let’s get going!
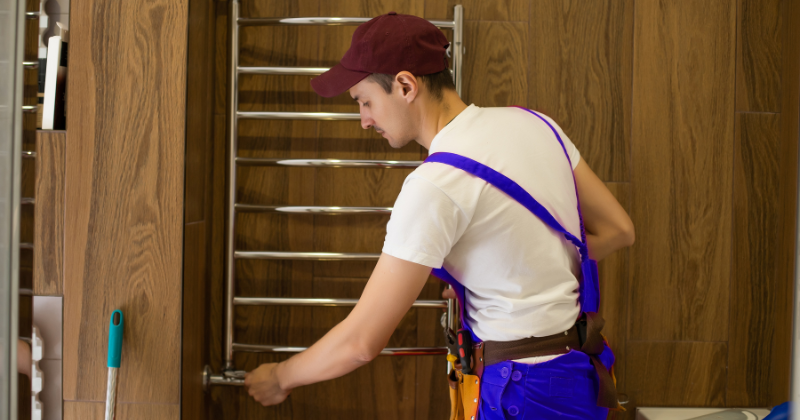
Plug-In Heated Towel Rail
First, let’s talk about a towel rail that plugs into the wall outlet.

Find the Studs
The best way to secure anything to the wall is to drill into the house’s studs. This will ensure that the item doesn’t get ripped out of the wall. Use a stud-finder to locate where the studs are in the wall.
Make sure that the location you chose is near an electrical outlet so that the cord will reach the outlet to plug into. Test the length of the cord before you move on to the next step.
If the studs aren’t in a good position for fitting a heated towel rail, you can use toggle bolts that have wings that pop open inside the wall to prevent whatever you are hanging from becoming loose on the wall.

Make Your Marks
Use a pencil to mark the wall in the spot where the support anchors will sit. Usually, towel rails have 4 support anchors – 2 on each side. Or the support anchors may be sperate pieces that attach to the wall and then the towel rail slides into during the final step of installation.
Always read the instructions that came with your heated towel rail to get a grasp on how it should be installed.
Once you have made your pencil marks on the wall, use a tape measure to confirm that the anchors are both at the exact same height from the ground up. If they aren’t, your towel rail will be lopsided.

Drill Holes and Hang Rail
Use your drill to make holes in the middle of the mark you made with your pencil. If you don’t have studs and must use toggle bolts, wiggle the drill up and down to make the hole slightly larger.
Next, hook the rail onto the support anchors. Use the instructions that came with the rail kit to make sure you hang the rail properly.
You’re done!
Fitting a Hydronic Towel Rail
The best way to install a hydronic towel rail is to replace the old radiator with the heated towel rail.

Find the Pipes and Take Measurements
The first step is to find the radiator supply and return lines. If you’ve already removed the previous radiator you will see copper pipes coming out of the wall or the floor.
These pipes will connect to your new heated towel rail. Next, measure the vertical and horizontal distance between the pipes that are there and the towel rail’s supply and return lines. Use this number to determine if you need to get an extra length of copper pipe to connect the parts.

Install the Towel Rack
Next, follow the instructions above for how to measure and install the towel rack on the wall.

Connect to Pipes
Once your heated towel rack is firmly mounted to the wall, you will connect the copper pipe in your home to the rail’s supply and return lines.
Use the amount of copper pipe that you need to connect both sections of pipes. You might have to solder the pipes together. If so, use some kind of cover to protect your bathroom floor and walls.
That’s it! You now know how to fit a heated towel rail to your bathroom by replacing a water radiator. Now that the weather is cooling down, make sure you are ready for autumn by reading these electric radiator heating tips.
Hard Wiring a Heated Towel Rail
The third way to install a heated towel rail is by hard wiring the rail into the electricity of the bathroom.
This method prevents unsightly cords from showing because it does not plug into an electrical outlet. It is also a great method if you don’t have a radiator in your bathroom.
However, working with electrical currents is dangerous. This type of heated towel rail should only be installed by professional, licensed electricians.

Approximate Cost of Fitting A Heated Towel Rail
Navigating the costs of installing a heated towel rail requires a keen understanding of various aspects. Each facet, from choosing the best heated towel rail for your home to deciding on the installation method and considering potential professional help, comes with its financial considerations. Let’s break down some key points:
- Variability: Costs can differ based on the type of rail, installation method, and if professional help is enlisted.
- Types of Rails: Electric and hydronic towel rails might have different pricing due to their installation requirements.
- Balancing Act: It’s crucial to balance these costs against the aesthetic and practical value of the towel rail.
- Cost Calculations: Utilising the cost of fitting a heated towel rail calculator might provide a tailored estimate.
- Installation Regulations: Adhering to heated towel rail installation regulations ensures safety and compliance.
- Size Matters: Considering standard towel rail sizes and heated towel rail dimensions impacts cost and installation.
- Quality and Reviews: Exploring the best heated towel rails in UK reviews can guide you towards a worthy investment.
Calculating the Potential Cost of Fitting a Heated Towel Rail
The type of rail, installation complexity, and additional materials all play a pivotal role in determining the overall expenditure. Below is a simplified table to provide a ballpark figure of potential costs associated with each aspect:
| Item | DIY Installation (£) | Professional Installation (£) |
| Electric Towel Rail (Plug-in) | 100 – 300 | 150 – 450 |
| Electric Towel Rail (Hard-wired) | N/A | 250 – 600 |
| Hydronic Towel Rail | N/A | 300 – 700 |
| Additional Materials | 20 – 50 | 20 – 50 |
| Labour Cost | N/A | 100 – 300 |
Note: These prices are rough estimates, and actual costs can fluctuate based on model, location, and specific tradesperson rates. Always seek multiple quotes and consult professionals for accurate pricing.
DIY vs. Professional Installation
Deciding between DIY and professional installation of a heated towel rail involves balancing safety and budget. While hiring professionals guarantees safe and accurate fitting, especially for complex models, DIY can be more wallet-friendly but requires a good grasp of the process. Let’s explore some key considerations:
- Safety First: Professionals ensure safe fitting, crucial for hard-wired or hydronic models.
- Budget-Friendly: DIY, particularly for plug-in models, can be cost-effective but needs know-how.
- Decision Making: Balancing safety and budget is key to choosing the right installation approach.
- User Guide: A heated towel rail user guide can offer helpful tips for DIY installations.
- Accessory Installation: Remember the cost to install bathroom accessories during installation.
- Quality Check: Choose the best towel radiators to ensure durability and performance.

Bottom Line on How to Fit a Heated Towel Rail
Adding a heated towel rail to your bathroom brings warmth and luxury, ensuring you have snug towels and a handy drying solution. This article aims to be your go-to heated towel rail user guide, walking you through the different types and how to install them.
Whether you choose an electric, hydronic, or wall-mounted heated towel rail, you can add a bit of everyday luxury to your routines.
Thinking about making a change? Dive into the best options for your space, considering size with a classic chrome electric towel rail or affinity curve electric towel rail. Whichever you go for, a world of warmth and convenience is just a step away.


Leave a Reply